Thursday, January 30, 2014

CASology Week 80: Purple + FMS121 + Stencilled OCC

When I saw the sketch this week at Freshly Made Sketches, I decided immediately I would mask the circles and combine a couple of techniques from the Stenciled Online Card Class. Kristina Werner had stamped the inside of a stencil, then inked the edges, and I loved the way it looked. With the CASology Cue Word being "Purple" this week, I had my color palette.


I made a mask with two circles and stamped a Lawn Fawn Backdrops image in the center with Memento Grape Jelly. Dusty Concord Distress Ink was blended over the musical notes and then the birthday sentiment stamped.


A few clear and purple sequins add the finishing touch.


I have a long history of loving purple - I might have shared before that, after considering a thousand different shades of beige, we painted our house in Seattle purple - yet, it is a color I rarely used when papercrafting.

Thanks for stopping by,

Jacquie


Wednesday, January 29, 2014

Make It Monday #150: Window Screen Card

I'm taking a break from stenciling to play along with Make It Monday at Capture the Moment. This week there is a fun challenge to make a Window Screen Card - you can check out Melissa's tutorial here.


I had this beautiful My Mind's Eye paper that seemed perfect for the card, so skipped stamping the flowers and went right to die cutting the heart window and cover plate.


A trio of PTI buttons anchors the sentiment from Bountiful Banners.

Thanks for stopping by,

Jacquie

Sunday, January 26, 2014

Stenciled OCC + Fusion #2 + Monday Mood Board #25 + CAS(E) this Sketch! #61

I have had a fun weekend, crafting with friends yesterday and finishing up some cards today. I watched the Day 2 & 3 videos for the Stenciled class at Online Card Classes and disappeared into the office for most of the afternoon.


This post is going to be photo heavy, as I have four cards to share. I have decided to show them in the order they were presented in the class, so first up is a card based on Julie Ebersole's tutorial to use a stencil with spray mists.


To be honest, spray mists are not really my thing, but I am very happy with the clean lines on this panel. I would love the Chartreuse Color Shine to be a little more intense, but didn't want the paper to get too saturated.

The second technique that I played with was Layering & Masking Stencils presented by Jennifer McGuire and I loved this way more than I thought I would. I played around with many color combinations and a couple of different stencils. 

As you can see my first attempt to layer with the Crafter's Workshop Kaleidoscope stencil was not very successful.


I flipped the panel over and inked the layers again, this time shifting the stencil very slightly (only about  1/8") and love the pattern that was created.


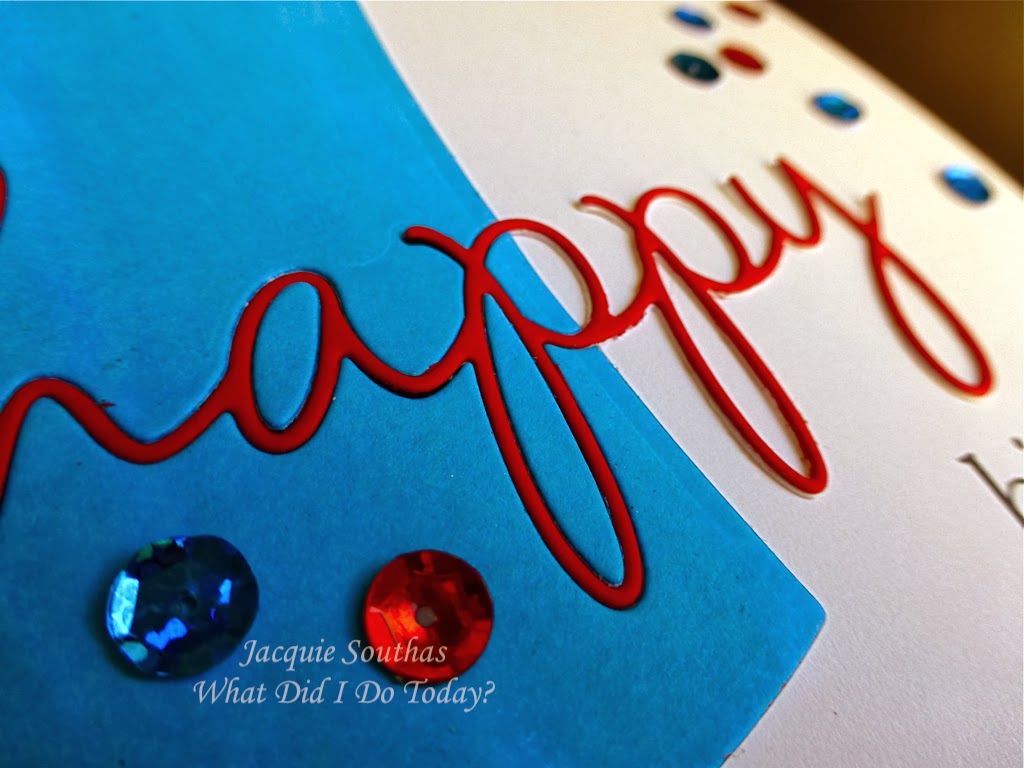
Jennifer masked off a portion of her panel to leave space for the sentiment, but I just stamped the sentiment on a strip of white cardstock and wrapped the ends around the patterned panel.


My third card is based on the Day 2 tutorial from Laura Bassen to watercolor with stencils.  I used the negative space of a die cut as a stencil.


As simple as this card is, it is a real stretch out of my comfort zone. I rarely work right on the card base or make one layer cards. I love that the watercolor did not seep through the cardstock - there was a little warping that ironed out after sitting under my son's Geo/Trig textbook for a while.

This card is also being linked to the CAS(E) this Sketch #61 challenge.


Are you still with me? I promise the end is in sight as this is the last card for today. Day 3 includes a tutorial from Debby Hughes to use molding paste with a stencil. I love Debby's cards and followed her lead to spray mist the panel first and then apply the paste.


I used Heidi Swapp's Tinsel Color Shine and chevron stencil. Before I applied the molding paste, I tinted it with Mustard Seed Distress Ink. The card is finished off with a dark grey leaf die cut, a vellum Wplus9 Lacey Layers die cut & sentiment from Written on Ribbon plus a few enamel dots.

This card is being entered in the Monday Mood Board #25 at Wplus9 and the Fusion Challenge #2 where the inspiration is from the colors in the photo.


Thanks for stopping by,

Jacquie


Saturday, January 25, 2014

Papertrey Ink January 2014 Blog Hop Take Two + MIM #149 + Stenciled OCC

I decided at the last minute to link this card up to the Papertrey Ink January 2014 Blog Hop and Make It Monday #149: Glitter Embellishments.

 January-Blog-Hop


The stamps and dies are from the Grand Ampersand stamp set. The hearts on the top panel are from a stencil that is selectively placed and inked and the hearts on the lower panel are from the stamp set.


The glittered heart is a shaker box loaded with tiny heart sequins.


I am also linking the card to the Stenciled Online Card Class gallery.

Thanks for stopping by,

Jacquie

Papertrey Ink January 2014 Blog Hop + Stencilled OCC

I have a card to share for the Papertrey Ink January 2014 Blog Hop where the challenge is to make a card using only pink and neutrals. I love the pink and gold in a couple of the inspiration photos, so started from there. 

January-Blog-Hop


My first thought was to make a Valentine, but I have a greater need for birthday cards, so that is what I created.


I'm taking the Stenciled class at Online Card Classes and this is a CASE of the card and technique Debby Hughes demonstrated on the first day.


I'm off to spend the day with a few crafty friends gettting messy with mixed media art, but will be back later tonight to hop around.

Thanks for stopping by,

Jacquie


Wednesday, January 22, 2014

MIM #149: Glittered Embellishments + Seize the Birthday

The Make It Monday challenge this week at PTI is from Heather Nichols, who has a great tutorial for making glittering embellishments from die cuts. I need to get a birthday card in the mail for my mother-in-law and thought this would be a great way to add bling to the card without adding bulk.


I followed Heather's technique to glitter the "happy" die cut. The rest of the sentiment is stamped on vellum with white pigment ink and embossed with Ranger Holographic embossing powder to extend the glittery look of the big "happy".


I wanted a little more glitter on the card and had watched Jennifer Rzasa's tutorial after following the link on Ardyth's blog (tell me I am not the only one that can accidently lose an hour or so following links between blogs).


I didn't want the whole card sparkling, so cut my cover plate die cut in half before adding the glitter - my intent was for more of a gradient look, but that didn't happen the way I envisioned.

I am also linking this card to Seize the Birthday where the topping this challenge is to color - does it count it I colored with glitter?


Thanks for stopping by,

Jacquie


Thursday, January 16, 2014

Merry Monday #91 + Muse #50 + Simon Says & MIM#148 Fail

I have a couple of cards to share today. This first one combines the Merry Monday Christmas Card Challenge #91 with the Muse Challenge #50 and Simon Says Stamp Wednesday blog challenge to Emboss It.


Simon Wednesday Challenge Blog


 Therese Calvird's Muse card inspired me to mask and color my quartet of Paper Smooches snowmen. This panel is then mounted on another panel embossed to mimic snow drifts.


A little sheer ribbon and a dangling metal snowflake finish the card off.

This next card started off with my attempt to play along with PTI's Make It Monday #148: Generation Stamping with Line Images & Multiple Colors (you can see Dawn's tutorial here). I really don't have many Line Image stamps, but played around with Reason to Smile to see what I could come up with.


I really like the card overall, but hated the stamped flowers, so today I pulled off that panel and made a new one.


This one will be linked to the Simon Says Stamp Monday Challenge blog where Anything Goes this week.

Simon Monday Challenge Blog


Thanks for stopping by,

Jacquie

Wednesday, January 15, 2014

CASology Week 78 + Simon Says & RIC#51


I'm popping between loads of laundry to post a couple of cards. This first one is for Runway Inspired Challenge #51.


I took my inspiration from the color palette and the thin lines (belt, black edging) on the outfit.


The "happy" die is partially inset in the blue panel. To keep the part of the word not inset on the same plane, I cut the word a second time out of white cardstock and layered it under the red die cut.


The black ink on the stamped part of the sentiment balances the black edge on the blue panel. A few sequins are a festive finish to the card.

This second card is being entered in the CASology Week 78: Dot challenge and the Simon Says Stamp Wednesday challenge to Emboss It.


Simon Wednesday Challenge Blog


This idea came to me quickly, and was just as quick to execute. I cut the circle (dot?) in the kraft panel first, then progressively smaller circles in scrap paper. Once I adhered the panel together, I marked the card base and stamped the sentiment.


A favorite Cuttlebug chevron dots embossing folder provides the more dots for the challenge and fun texture to the card.

Thanks for stopping by,

Jacquie

Sunday, January 12, 2014

Muse Challenge #49

The muse inspiration card is from Laurie Willison (sadly, her last one for the Muse Card Challenge) for Challenge #49.


I used a Tim Holtz stencil and few Distress Inks to create the ombre sun rays on a piece of patterned paper.


The stamps are from PTI's Hello Sunshine set.


Copic colored gems and a glitter pen finish everything off.

Thanks for stopping by,

Jacquie

Merry Monday #90 + CASology Week 77: Bubbly

I am just squeaking in under the wire on these two challenges. I had plans to make a couple of cards yesterday, but needed to rescue my dear husband who put off figuring out what he was wearing to a formal event we attended last night. His wardrobe requires very few dress clothes and he would have been happy to stop on our way to the event to pick up a shirt & tie - I wasn't willing to leave it that late, so so we had an unplanned trip to the mall.

The Merry Monday Christmas card challenge is to use ribbon or twine on a card.


We received our first "save the date" card for a summer wedding earlier this week, so the CASology Challenge Cue Card: Bubbly made me think of a champagne wedding toast.


The wine flutes are from MFT and cut with vellum and gold glitter paper then popped up on a PTI tag. The sentiment is from Avery Elle.

Thanks for stopping by,

Jacquie

Saturday, January 11, 2014

Fusion #1

I'm happy to see the Fusion Card Challenge is back for the new year! The challenge is to use either the inspiration photo or the sketch or fuse the two together to make a card.


I was definitely inspired by the colors and geometric lines in the photo, but also used most elements of the sketch on my card.


The sentiment banner is only adhered on the outside edges and lifts off the panel in the center - love this Avery Elle sentiment.


Thanks for stopping by,

Jacquie

Thursday, January 9, 2014

MIM #147 + FMS118 + Card Concept #1

The Make It Monday #147: Multi-layer Images from a Single Stamp is from Betsy this week - you can check out the tutorial here. The "Be Mine" heart from the PTI's With All My Heart stamp set works perfectly for this technique.

The image is stamped with Memento Luxe Angel Pink, PTI Hibiscus Burst and Raspberry Fizz inks and cut apart. The reassembled image is slightly popped up between layers and adhered to a Razpberry Fizz pinked edge heart.


This heart sat on my desk for a couple days waiting to be put on a card. The Freshly Made Sketches provided a great layout and, by adding chocolate brown and kraft to the mix I met the color challenge at the new Card Concept Challenge. I'm not sure if this card is considered Clean & Simple or Clean & Graphic or Clean & Layered?


The chevron border is created by cutting two Chocolate Brown and one Raspberry Fizz chevrons and attaching them to a white cardstock base. The panel was then embossed with hearts.

Thanks for stopping by,

Jacquie